- TTFB 从 1 ~ 3 秒降到 50 ~ 300 ms
- HTML 页面真正命中缓存
- 发布新文章后缓存自动刷新
- 登录用户和后台永远不缓存
适用环境: 宝塔面板 + Nginx + WordPress + Cloudflare(4 核 8G 及以上服务器)
最终架构长什么样
先看全局,再一步步配。
用户请求
  ↓
Cloudflare(CDN + HTML 缓存,TTL 10 分钟)
  ↓
Nginx FastCGI Cache(页面级缓存,10 分钟)
  ↓
PHP-FPM
  ↓
Redis Object Cache(数据库查询缓存)
  ↓
MySQL
每一层解决不同的问题:
| 缓存层 | 缓存什么 | TTL | 不缓存什么 |
|---|---|---|---|
| Cloudflare | HTML 页面、静态资源 | HTML 10 分钟,静态 30 天 | wp-admin、登录态 |
| Nginx FastCGI Cache | PHP 渲染后的 HTML | 10 分钟 | POST 请求、后台、登录 Cookie |
| Redis Object Cache | 数据库查询结果 | 按对象 TTL | 无(自动管理) |
| 浏览器 | CSS/JS/图片 | 30 天 | HTML(no-cache) |
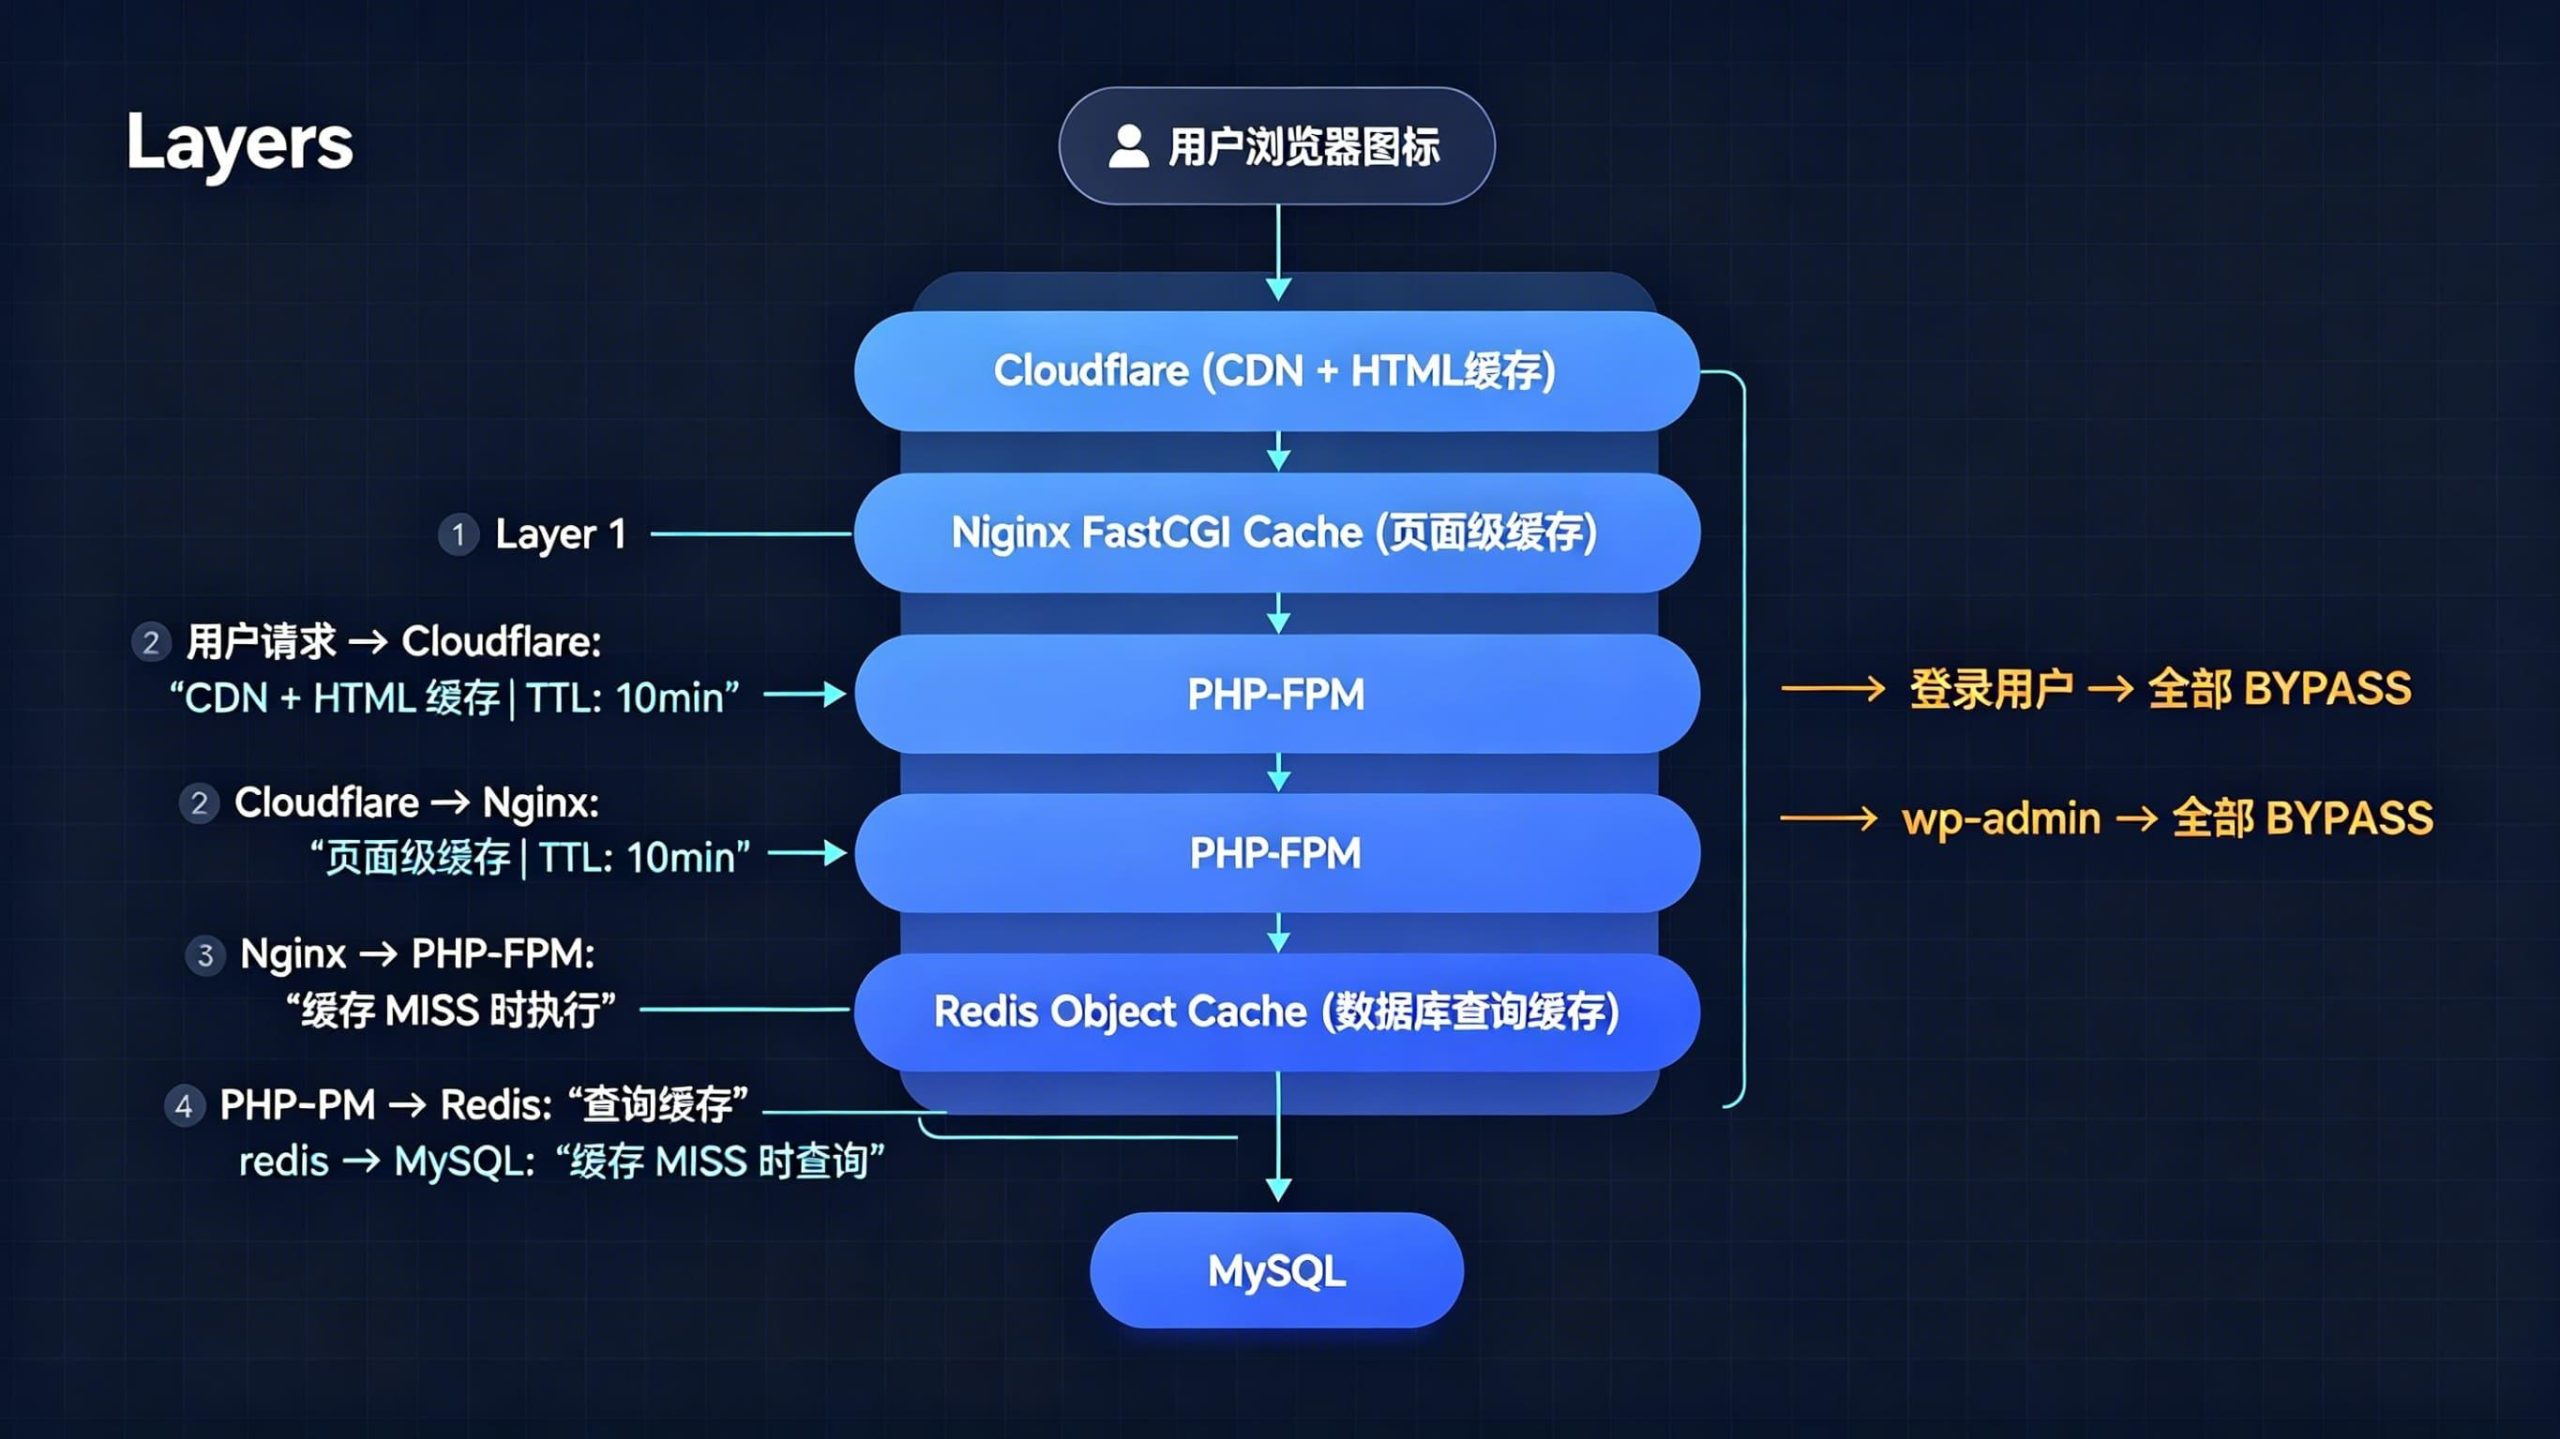
核心逻辑:Cloudflare 和 Nginx 都缓存 HTML,但都跳过登录用户和后台。Redis 在数据库层减少重复查询。
下面开始配置。
第一步:安装 Redis 并启用 Object Cache
Redis 缓存数据库查询结果,减少 WordPress 每次请求都打 MySQL 的问题。
1.1 宝塔安装 Redis
宝塔面板 → 软件商店 → 搜索 Redis → 安装。
推荐版本:Redis 7.x
1.2 安装 PHP Redis 扩展
宝塔面板 → 软件商店 → 你用的 PHP 版本 → 设置 → 安装扩展 → 找到 redis → 安装。
1.3 WordPress 安装 Redis Object Cache 插件
后台 → 插件 → 安装插件 → 搜索 Redis Object Cache → 安装并启用。
进入 设置 → Redis → 点击 Enable Object Cache。
状态显示 Connected 就对了。
第二步:配置 Nginx FastCGI Cache
这是最关键的一步。配置完后,Nginx 会把 PHP 渲染出的 HTML 缓存到磁盘,下次请求直接返回,不再走 PHP。
2.1 编辑 nginx.conf
文件路径:
/www/server/nginx/conf/nginx.conf在 http { 下面添加:
# FastCGI Cache 配置
fastcgi_cache_path /tmp/nginx_cache levels=1:2 keys_zone=WORDPRESS:100m inactive=60m;

# 登录限速(防暴力破解)
limit_req_zone $binary_remote_addr zone=one:10m rate=1r/s;
参数说明:
keys_zone=WORDPRESS:100m— 缓存索引区 100MB,够用inactive=60m— 60 分钟没人访问就清除levels=1:2— 两级目录结构,避免单目录文件过多
2.2 创建缓存目录
mkdir -p /tmp/nginx_cache
chmod -R 777 /tmp/nginx_cache
2.3 编辑网站 Nginx 配置
文件路径:
/www/server/panel/vhost/nginx/你的域名.conf完整配置如下(把 www.example.com 和路径替换成你自己的):
server {

    listen 80;
    listen 443 ssl http2;

    server_name www.example.com;
    root /www/wwwroot/www.example.com;
    index index.php index.html index.htm;

    # ===== SSL =====
    ssl_certificate /www/server/panel/vhost/cert/www.example.com/fullchain.pem;
    ssl_certificate_key /www/server/panel/vhost/cert/www.example.com/privkey.pem;
    ssl_protocols TLSv1.2 TLSv1.3;
    ssl_session_timeout 1d;
    ssl_session_cache shared:SSL:10m;
    ssl_prefer_server_ciphers on;
    add_header Strict-Transport-Security "max-age=31536000" always;

    # ===== GZIP =====
    gzip on;
    gzip_comp_level 6;
    gzip_min_length 1k;
    gzip_types
        text/plain
        text/css
        text/javascript
        application/javascript
        application/json
        application/xml
        image/svg+xml;

    # ===== 上传限制 =====
    client_max_body_size 100m;

    # ===== WordPress Rewrite =====
    location / {
        add_header Cache-Control "no-cache, must-revalidate";
        try_files $uri $uri/ /index.php?$args;
    }

    # ===== 静态资源缓存 =====
    location ~* .(jpg|jpeg|png|gif|ico|css|js|svg|woff|woff2|ttf|webp)$ {
        expires 30d;
        access_log off;
        log_not_found off;
        add_header Cache-Control "public, immutable";
    }

    # ===== robots / favicon =====
    location = /robots.txt {
        access_log off;
        log_not_found off;
    }
    location = /favicon.ico {
        access_log off;
        log_not_found off;
    }

    # ===== 禁止敏感文件 =====
    location ~ /.(ht|git|env) {
        deny all;
    }

    # ===== 禁止上传目录执行 PHP =====
    location ~* /(?:uploads|files)/.*.php$ {
        deny all;
    }

    # ===== Let's Encrypt =====
    location ~ /.well-known {
        allow all;
    }

    # ===== 登录限速 =====
    location = /wp-login.php {
        limit_req zone=one burst=5 nodelay;
        include fastcgi.conf;
        fastcgi_pass unix:/tmp/php-cgi-74.sock;
    }

    # ===== PHP + FastCGI Cache =====
    location ~ .php$ {
        include fastcgi.conf;
        fastcgi_pass unix:/tmp/php-cgi-74.sock;
        fastcgi_index index.php;

        # 默认缓存
        set $skip_cache 0;

        # POST 请求不缓存
        if ($request_method = POST) {
            set $skip_cache 1;
        }

        # 只排除特定参数(不要排除所有 query_string)
        if ($query_string ~* "preview=true|nocache") {
            set $skip_cache 1;
        }

        # 后台和特殊路径不缓存
        if ($request_uri ~* "/wp-admin/|/wp-login.php|/xmlrpc.php|/feed/|sitemap(_index)?.xml") {
            set $skip_cache 1;
        }

        # 登录用户不缓存
        if ($http_cookie ~* "wordpress_logged_in|comment_author|woocommerce_items_in_cart") {
            set $skip_cache 1;
        }

        # FastCGI Cache 核心
        fastcgi_cache WORDPRESS;
        fastcgi_cache_valid 200 301 302 10m;
        fastcgi_cache_bypass $skip_cache;
        fastcgi_no_cache $skip_cache;

        fastcgi_cache_use_stale
            error
            timeout
            invalid_header
            updating
            http_500
            http_503;

        add_header X-Cache $upstream_cache_status;
    }

    # ===== Cloudflare Real IP =====
    real_ip_header CF-Connecting-IP;
    set_real_ip_from 173.245.48.0/20;
    set_real_ip_from 103.21.244.0/22;
    set_real_ip_from 103.22.200.0/22;
    set_real_ip_from 103.31.4.0/22;
    set_real_ip_from 141.101.64.0/18;
    set_real_ip_from 108.162.192.0/18;
    set_real_ip_from 190.93.240.0/20;
    set_real_ip_from 188.114.96.0/20;
    set_real_ip_from 197.234.240.0/22;
    set_real_ip_from 198.41.128.0/17;
    set_real_ip_from 162.158.0.0/15;
    set_real_ip_from 104.16.0.0/13;
    set_real_ip_from 104.24.0.0/14;
    set_real_ip_from 172.64.0.0/13;
    set_real_ip_from 131.0.72.0/22;

    # ===== 错误页 =====
    error_page 404 /404.html;
    error_page 500 502 503 504 /502.html;

    access_log /www/wwwlogs/example.log;
    error_log /www/wwwlogs/example.error.log;
}
注意:
fastcgi_pass后面的 socket 路径要和你 PHP 版本对应。比如 PHP 7.4 是php-cgi-74.sock,PHP 8.1 是php-cgi-81.sock。在宝塔面板的 PHP 设置里可以确认。
2.4 测试并重启 Nginx
nginx -t显示 syntax is ok 和 test is successful 后:
service nginx restart第三步:配置 Cloudflare Cache Rules
Cloudflare 默认只缓存静态资源。要让 HTML 也缓存,必须手动加 Cache Rules。
3.1 SSL/TLS 设置
Cloudflare → SSL/TLS → 设置为 Full (strict)。
不要用 Flexible,否则 Cloudflare 和你服务器之间走 HTTP,既不安全也可能出重定向循环。
3.2 Speed Optimization
Cloudflare → Speed → Setting:
- HTTP/3:开启
- Early Hints:开启
3.3 添加 Cache Rules
进入 Cloudflare → Caching → Cache Rules。
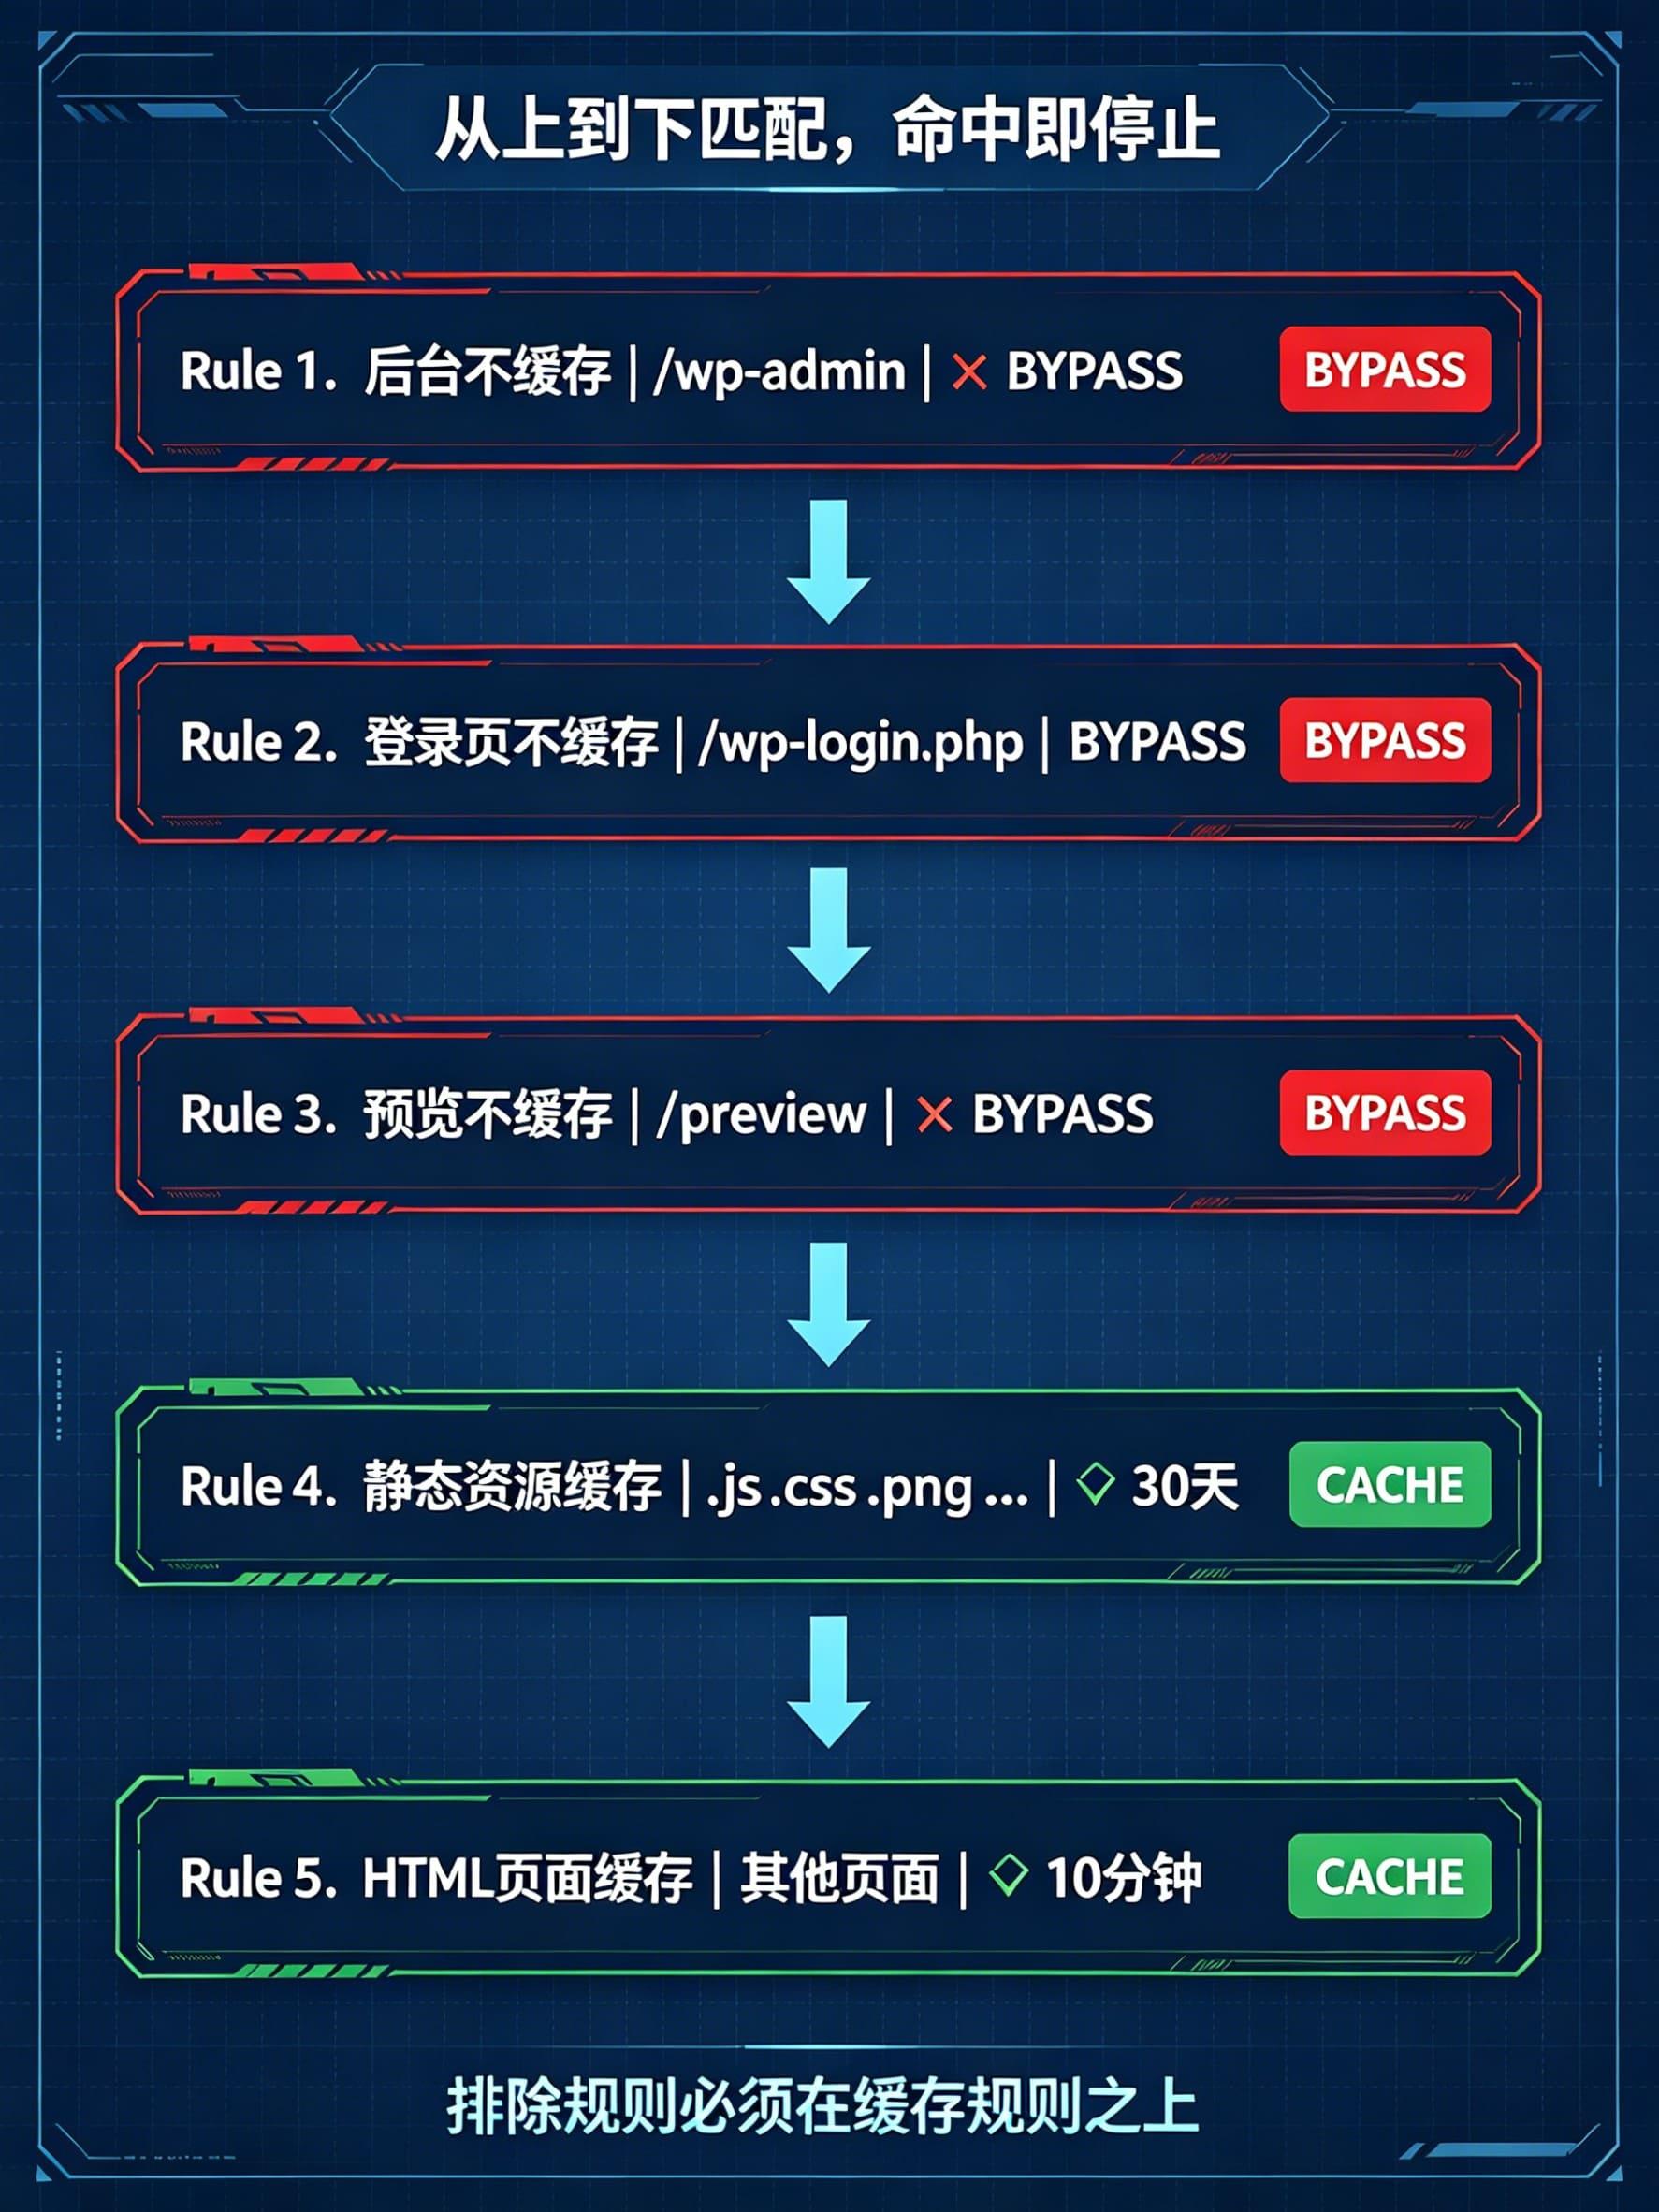
规则按顺序添加,Cloudflare 从上往下匹配,先写排除规则,再写缓存规则。
规则 1:后台不缓存
表达式:
(http.request.uri.path contains "/wp-admin")操作:绕过缓存
规则 2:登录页不缓存
表达式:
(http.request.uri.path contains "/wp-login.php")操作:绕过缓存
规则 3:预览页面不缓存
表达式:
(http.request.uri.path contains "/preview")
or
(http.request.uri.path contains "preview=true")操作:绕过缓存
避免 WordPress 文章预览被缓存,导致你看到的永远是旧版本。
规则 4:静态资源缓存 30 天
表达式:
(http.request.uri.path.extension in {"js" "css" "png" "jpg" "jpeg" "gif" "ico" "svg" "woff" "woff2" "ttf" "webp"})操作:
- 符合缓存条件
- Edge TTL:30 天
- 浏览器 TTL:30 天
静态资源变更频率低,缓存 30 天可以大幅减少回源。如果你用了文件名哈希(如 style.a1b2c3.css),可以直接缓存到 1 年。
规则 5:HTML 页面缓存 10 分钟
表达式:
(http.host eq "www.example.com")
and
(not http.cookie contains "wordpress_logged_in")
and
(not http.request.uri.path contains "/wp-admin")
and
(not http.request.uri.path contains "/wp-login.php")
and
(not http.request.uri.path contains "/preview")
操作:
- 符合缓存条件
- 忽略缓存控制头(Override origin)
- Edge TTL:10 分钟
这条规则是核心。它让 Cloudflare 把 HTML 页面缓存 10 分钟,但排除已登录用户和后台。忽略缓存控制头是因为 WordPress 默认会给 HTML 加 no-cache,不覆盖的话 Cloudflare 不会缓存。
规则顺序很重要。 Cloudflare 按从上到下的顺序匹配,匹配到第一条就停止。所以"不缓存"的规则必须放在"缓存"的规则上面。
第四步:安装自动 Purge 插件
缓存配好了,但有个问题:发布新文章后,首页和文章页还是旧缓存。
必须让发布内容时自动清缓存。需要两个插件配合。
4.1 Nginx Helper — 清 Nginx 层缓存
后台 → 插件 → 安装 Nginx Helper → 启用。
进入 设置 → Nginx Helper:
- Enable Purge:勾选
- Caching Method:选择
nginx Fastcgi cache - Purge Method:选择
Delete local server cache files
保存。
4.2 Cloudflare 插件 — 清 Cloudflare 层缓存
后台 → 插件 → 安装 Cloudflare → 启用。
创建 API Token:
- 打开 Cloudflare API Tokens
- Create Token → 选择 WordPress 模板
- 确保权限设置:
- Zone → Cache Purge → Purge
- Zone → Zone → Read
- 复制 Token
插件配置:
- 进入 WordPress 后台 → Cloudflare 设置
- 填入 Email 和 API Token
- 开启 Auto Purge Content On Update
这样每次发布或更新文章,Cloudflare 对应页面的缓存会自动清除。
第五步:验证缓存是否生效
配置完不代表生效了。用以下方法逐层验证。
5.1 验证 Nginx FastCGI Cache
用浏览器访问首页(无痕模式,确保没登录),按 F12 → Network → 刷新页面 → 点第一个请求 → 查看 Response Headers。
找到:
x-cache: HITHIT= 缓存命中,Nginx 直接返回了缓存BYPASS= 跳过缓存(登录了或命中了排除规则,正常)MISS= 第一次访问,还没有缓存。再刷一次,应该变成HIT
5.2 验证 Cloudflare 缓存
同样的 Response Headers 里找:
cf-cache-status: HITHIT= Cloudflare 缓存命中MISS= 第一次,再刷一次看BYPASS= 被你的 Cache Rule 排除了(检查是不是后台或登录状态)
5.3 验证 Redis
WordPress 后台 → 设置 → Redis → 状态页。
查看:
- Hits 应该在增长
- Hit Ratio 应该 > 80%
- Connected 状态
5.4 验证自动 Purge
- 发布一篇新文章
- 无痕模式打开首页
- 看新文章是否立即出现
- 检查 Response Headers,
cf-cache-status和x-cache是否显示MISS(说明缓存被清过,重新生成了)
我踩过的三个坑
配置过程中最容易翻车的三个地方。
坑 1:Cloudflare 缓存了登录态页面
现象: 无痕模式打开网站,页面上居然显示你的用户名。
原因: Cloudflare Cache Rules 里没有排除 wordpress_logged_in Cookie。你登录状态下访问的页面被 Cloudflare 缓存了,其他访客看到的也是你登录后的页面。
修复: Cache Rule 表达式里必须加上:
not http.cookie contains "wordpress_logged_in"这个必须加,不加就是安全事故。
坑 2:FastCGI Cache 一直 BYPASS
现象: 怎么刷 x-cache 都是 BYPASS。
原因: query_string 的排除条件写太严了。我最开始写的是:
if ($query_string != "") {
    set $skip_cache 1;
}
这意味着任何带参数的请求都不缓存。但现实中 UTM 参数(utm_source、fbclid、gclid)到处都是,导致大量正常流量命中不了缓存。
修复: 只排除真正需要跳过的参数:
if ($query_string ~* "preview=true|nocache") {
    set $skip_cache 1;
}
改完后缓存命中率直接上去了。
坑 3:ssl_session_cache 冲突
现象: nginx -t 报错 shared memory zone "SSL" conflicts。
原因: 服务器上有多个网站,每个网站的 Nginx 配置里都写了:
ssl_session_cache shared:SSL:10m;同一个 shared zone 名字在不同配置里大小不一样就会冲突。
修复: 所有网站的 ssl_session_cache 统一成相同大小,或者只在 nginx.conf 的 http {} 里写一次。
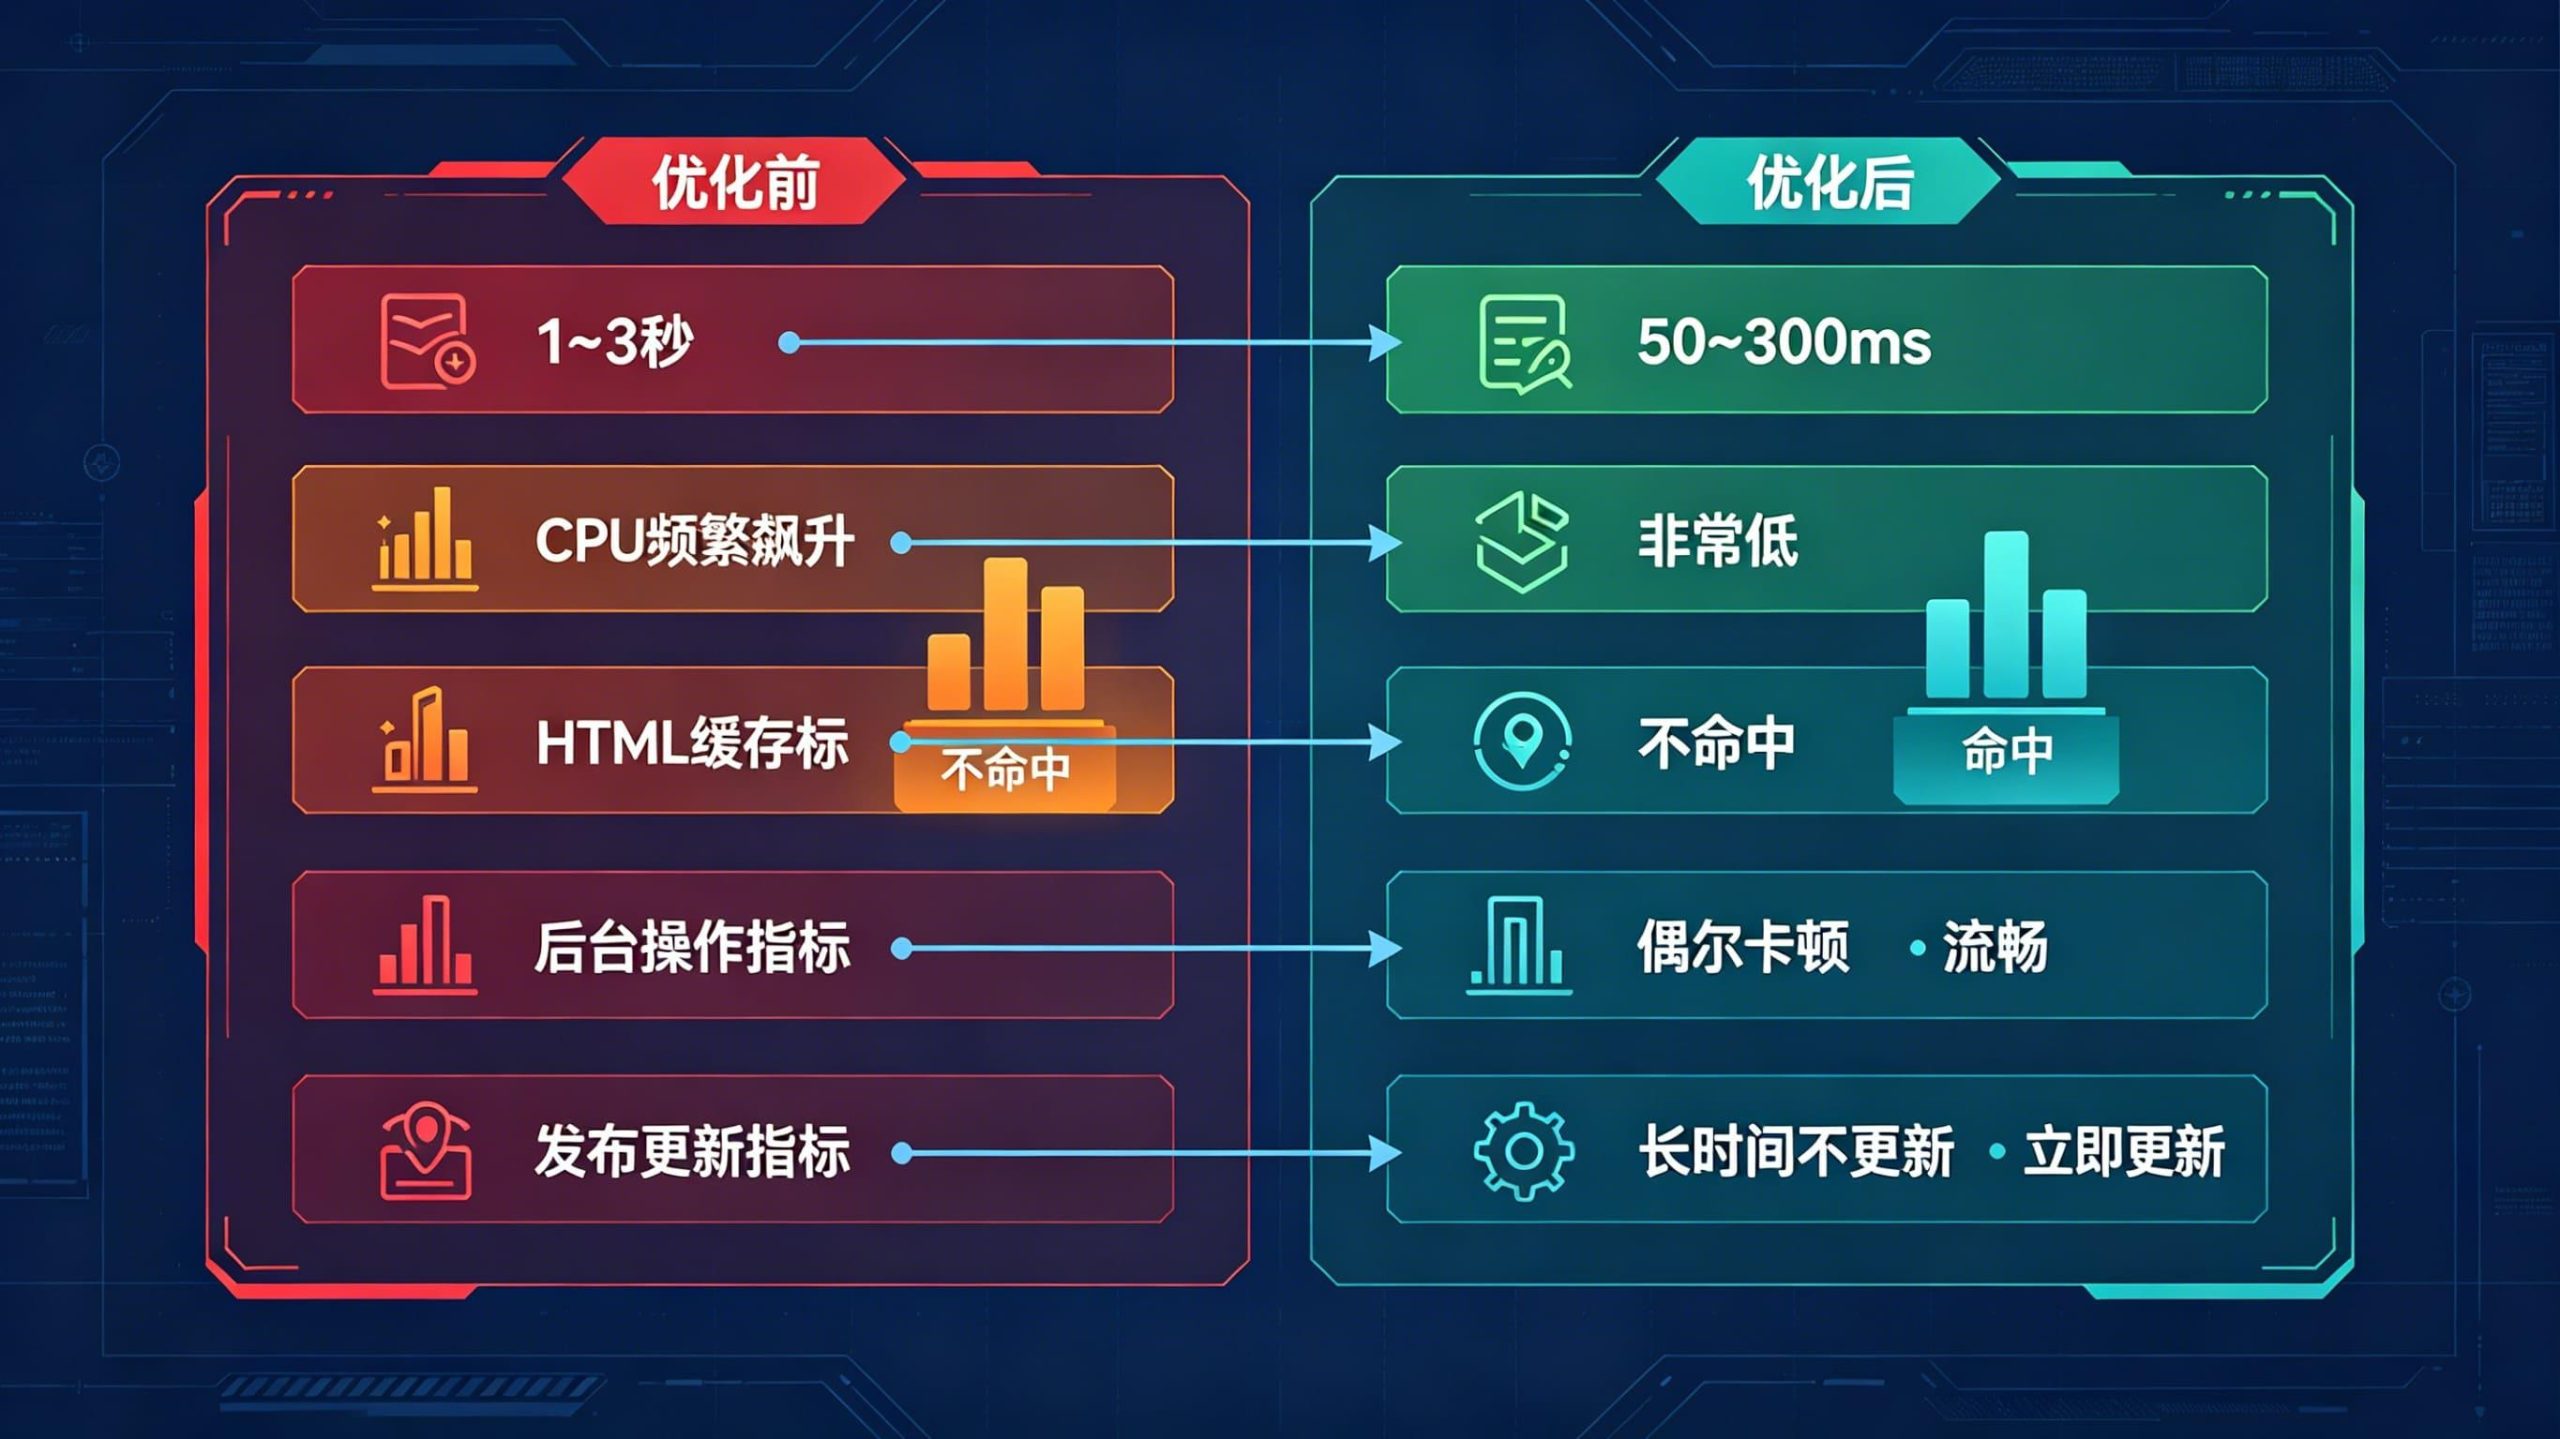
优化前后对比
| 指标 | 优化前 | 优化后 |
|---|---|---|
| TTFB | 1~3 秒 | 50~300ms |
| CPU 占用 | 频繁飙升 | 非常低 |
| HTML 缓存 | 不命中 | 命中 |
| 后台操作 | 偶尔卡顿 | 流畅 |
| 发布新文章 | 首页长时间不更新 | 立即更新 |
上线前检查清单
逐条确认,全打勾再上线。
- Redis 已安装,PHP Redis 扩展已启用
- Redis Object Cache 插件状态为
Connected -
nginx.conf里添加了fastcgi_cache_path -
/tmp/nginx_cache目录已创建,权限 777 - 网站 Nginx 配置里
fastcgi_pass路径和 PHP 版本匹配 -
nginx -t测试通过 - Cloudflare SSL/TLS 设为
Full (strict) - Cloudflare Cache Rules 添加了五条规则(后台排除、登录排除、预览排除、静态资源缓存、HTML 缓存)
- Cache Rule 排除了
wordpress_logged_inCookie - Nginx Helper 已启用,Purge Method 设为
Delete local server cache files - Cloudflare 插件已配置 API Token,
Auto Purge Content On Update已开启 - 无痕模式访问首页,
x-cache: HIT - 无痕模式访问首页,
cf-cache-status: HIT - 发布测试文章,无痕模式验证首页立即更新
- 后台页面没有被缓存(
cf-cache-status: BYPASS)
适用范围
这套方案适用于:
- 宝塔面板 + Nginx + WordPress
- 服务器 2 核 4G 及以上(Redis 占用内存不大)
- Cloudflare 免费版即可(Cache Rules 免费版有 10 条额度,够用)
不适合:
- 使用 Apache / OpenLiteSpeed 的环境(Nginx FastCGI Cache 是 Nginx 专属)
- 超大流量站点(日 PV 50 万+,建议考虑 Redis 页面缓存或 CDN 全量回源方案)
- 使用页面缓存插件(如 WP Rocket)且功能冲突时(选一套,不要叠)
如果你的 WordPress 还在裸奔——没有 Redis、没有页面缓存、Cloudflare 只开了代理——按这篇配完,体感提升会非常明显。